
A high-quality leather jacket is more than just a garment; it is an investment, a statement piece, and often, a vessel for memories. However, fashion trends evolve, and leather, being a natural material, can fade over time. You might find yourself staring at a perfectly good vintage brown bomber jacket, wishing it were a sleek midnight black, or perhaps a thrift store find needs a vibrant revival.
The short answer is yes, you can dye a leather jacket a new color. However, the process is far more scientific than simply applying a coat of paint. It requires an understanding of leather chemistry, porosity, and the correct sequence of preparation. In this guide, we will explore the professional methods of leather transformation, ensuring your jacket remains soft, durable, and stylish.
The Science of Leather: Why Some Jackets Dye Better Than Others
Before picking up a brush, you must understand the “canvas.” Leather is skin, and its ability to accept new pigment depends on how it was originally tanned and finished.
Aniline vs. Pigmented Leather
Most premium jackets are either aniline or semi-aniline. Aniline leather is dyed with soluble dyes without covering the surface with a topcoat. This makes it highly porous and the best candidate for DIY dyeing. Pigmented (or protected) leather has a plastic-like coating that repels liquids. To dye this, the original seal must be chemically stripped.
The Porosity Test
To determine if your jacket is ready for a color change, perform the “Water Drop Test.” Place a single drop of water on a hidden area. If the water beads up and rolls off, the leather is sealed. If it soaks in and darkens the leather, it is porous and will accept dye easily. Understanding the tanning process is essential to knowing how fibers react to new chemicals.
Choosing Your Weapon: Oil-Based vs. Water-Based Dyes
Not all dyes are created equal. The “best” dye depends on your desired finish and the type of leather you are working with.
- Oil-Based Dyes (Pro Dyes): These are the gold standard for professionals. Brands like Fiebing’s offer alcohol-reduced oil dyes that penetrate deep into the grain. They provide the most permanent color and won’t crack or peel.
- Water-Based Dyes: These are eco-friendly and produce less odor. While they are easier to clean up, they may not penetrate as deeply as oil-based versions, making them better for slight color refreshes rather than total transformations.
- Leather Paints (Acrylics): If you are trying to go from a dark color to a light color (e.g., Black to Tan), dye will not work. You must use acrylic leather paints, such as those by Angelus Direct, which sit on top of the leather rather than soaking in.
Essential Tool Kit for Leather Dyeing
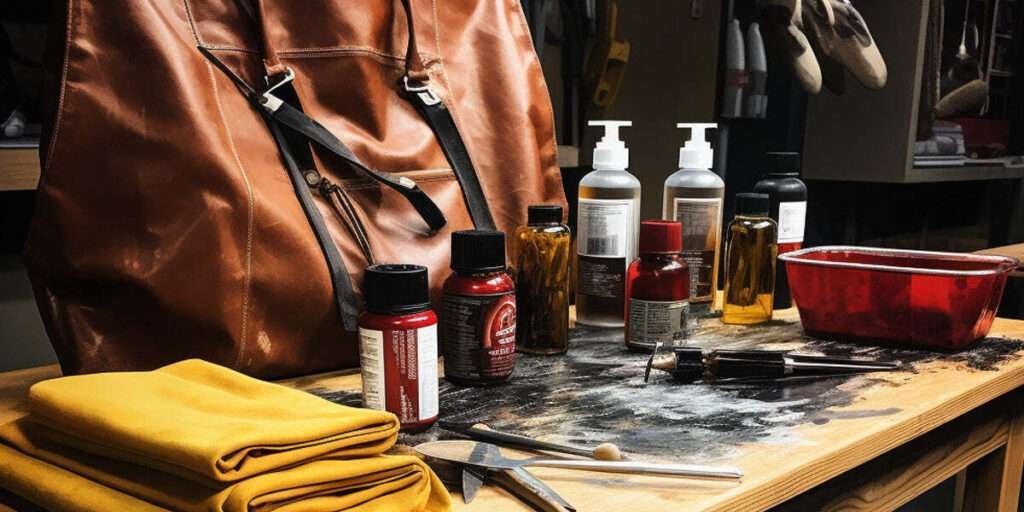
To achieve a professional-grade finish at home, you need more than just dye. Assemble the following materials:
- Leather Deglazer/Preparer: Essential for stripping the old factory finish.
- Wool Daubers or High-Density Sponges: For even application.
- Painter’s Tape: To protect zippers, snaps, and internal linings.
- Latex Gloves: Leather dye will stain skin for weeks.
- Leather Sealer (Resolene): To lock in the color and add a water-resistant layer.
- Leather Conditioner: To restore moisture after the drying process.
The Step-by-Step Professional Dyeing Process
Step 1: Deep Cleaning and Preparation
You cannot dye a dirty jacket. Use a dedicated leather cleaner to remove oils, salts (from sweat), and dust. Pay close attention to the collar and cuffs, where skin oils accumulate.
Step 2: The Deglazing Phase (The Most Important Step)
This is where most DIY projects fail. Manufacturers apply a clear topcoat to protect the leather. If you don’t remove this, the dye will sit on top and eventually rub off on your clothes. Using a Leather Deglazer (or high-grade acetone), wipe down the entire jacket until the surface looks “dull.” This opens the pores of the leather.
Step 3: Masking the Hardware
Use painter’s tape to cover all metal zippers, buttons, and decorative studs. Dye is incredibly difficult to remove from metal once it sets. If your jacket has a fabric lining that you don’t want to dye, tuck it in and secure it with tape.
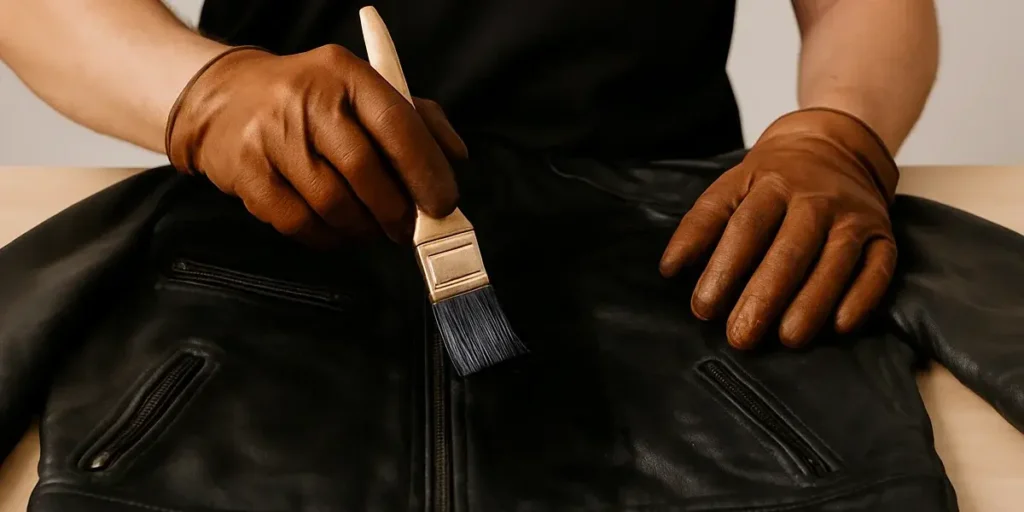
Step 4: Applying the Dye
Apply the dye in thin, even layers. Use circular motions to ensure the pigment enters the natural grain of the hide.
- Pro Tip: It is always better to apply three thin coats than one heavy coat. A heavy coat can lead to “bronzing,” where excess pigment sits on the surface and creates a metallic, unnatural sheen.
Step 5: The Drying Period
Allow the jacket to dry naturally in a cool, dry place. Avoid using a hairdryer or placing it near a radiator, as rapid heat can cause the leather fibers to shrink and become brittle. A minimum of 24 hours is recommended for the dye to stabilize.
Step 6: Buffing and Sealing
Once dry, take a clean microfiber cloth and buff the entire jacket. You will see some pigment coming off; this is normal. Continue buffing until no more color transfers to the cloth. Finally, apply a leather sealer (like Resolene or a satin acrylic finisher). This prevents the dye from “bleeding” when you get caught in the rain.
Changing Colors: The Reality of Color Theory
When dyeing leather, you must respect the laws of color theory. Because leather dye is translucent (like a stain), the base color will always affect the final result.
- Tan to Dark Brown: Very easy. The tan acts as a warm base.
- Red to Black: Very easy. Black pigment is strong enough to cover any underlying hue.
- Black to Any Other Color: Impossible with dye. To change a black jacket to a lighter color, you must use leather paint, which acts as an opaque “skin” over the original leather.
- Blue to Green: If you apply yellow dye to a blue jacket, you will likely end up with a forest green result.
For those interested in the environmental impact of these chemicals, the Leather Working Group (LWG) provides extensive resources on sustainable leather processing and chemical safety.
Special Considerations for Suede and Nubuck
Suede and nubuck are “napped” leathers. They are extremely porous but also very delicate. You cannot use standard leather dyes or paints on suede, as they will “glue” the fibers together, destroying the soft texture. Use only specialized Suede Dye and, once dry, use a brass-bristled suede brush to “wake up” the nap and restore its velvet-like feel.
Troubleshooting Common Issues
1. The Leather Feels Stiff:
Dyeing is a chemical process that removes moisture. After the sealer has dried, apply a high-quality leather conditioner. The leather will “drink” the conditioner and regain its suppleness.
2. The Color is Blotchy:
This usually happens due to uneven deglazing. If the color is inconsistent, you may need to apply another light coat of dye, focusing on the lighter areas.
3. The Dye Rubs Off on White Shirts:
This is known as “crocking.” It means the jacket wasn’t buffed enough or the sealer wasn’t applied correctly. Buff the jacket vigorously with a dry cloth until the transfer stops.
Post-Dye Maintenance: Keeping the Glow
Once you have successfully transformed your jacket, maintenance is key. Avoid prolonged exposure to direct sunlight, which can fade DIY dyes faster than factory-original colors. We recommend a light conditioning treatment every six months to keep the leather healthy and the color vibrant.
Frequently Asked Questions (FAQ)
Q: Can I use hair dye or fabric dye on my leather jacket?
A: Absolutely not. Hair dye and fabric dyes (like Rit) have different pH levels and chemical compositions. They will either fail to stick or permanently damage the structural integrity of the leather.
Q: How much does it cost to dye a leather jacket professionally?
A: Depending on the size and complexity, professional leather restorers charge between $150 and $400. Doing it yourself usually costs between $30 and $60 in materials.
Q: Will the dye cover scratches and scuffs?
A: Yes! Dyeing is an excellent way to hide scuffs and “cat scratches.” The pigment fills in the damaged areas where the original color has been rubbed away.
Conclusion
Dyeing a leather jacket is a rewarding DIY project that combines craft with fashion. By following the correct preparation steps, specifically deglazing and choosing the right type of dye, you can take a dated or worn garment and turn it into a custom masterpiece.
Remember, the key to a professional finish is patience. Don’t rush the cleaning or the drying phases. However, if you feel that your jacket is too valuable to risk a DIY attempt, or if you are looking for a fresh start with a brand-new silhouette, explore our latest collection.
Ready for a new look? Browse our Men’s Leather Jackets and Women’s Collection at LVH Leather for premium quality hides that are built to last a lifetime, in every classic color you could desire.